

Are Solar Ground Lights the smartest way to light a path without wiring?
2025-11-24
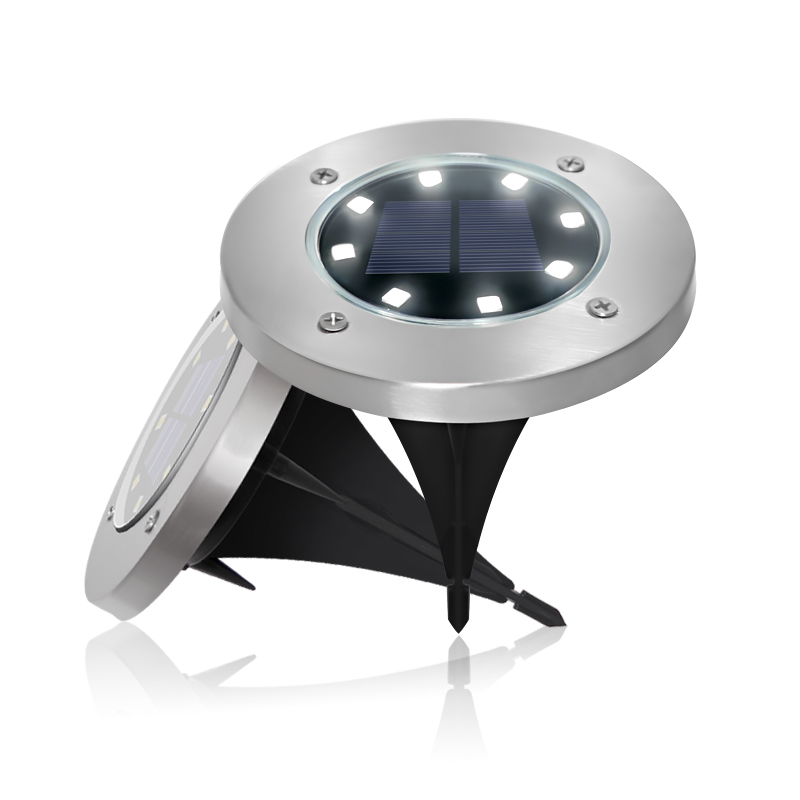
When I started upgrading my night paths, I kept coming back to Solar Ground Lights—low-profile discs that slip into soil and disappear by day. Among the sets I tried, Landsign quietly stood out: stainless steel where it should be tough, impact-resistant ABS where weight and weather matter, and a sensor that simply gets the timing right. I am solving real problems like dark steps, cable clutter, and puddle-prone gardens—exactly where Solar Ground Lights should shine.
What everyday problems do these lights actually solve?
Well-built Solar Ground Lights handle four frequent pain points in one go:
- No trenching or wiring—just press the stakes into the soil and move on.
- Even spread of guidance light along edges so feet find the path naturally.
- Automatic dusk-to-dawn operation that still works after rain.
- Low total cost of ownership with zero electricity bills.
How does build quality decide whether a light survives a full season?
- Reinforced shell—Landsign pairs stainless steel with engineered ABS to resist bending and rust so the bezel stays flat and neat.
- High-efficiency solar cell—a panel with strong photoelectric conversion fills the battery faster on clear days and still tops up under thin clouds.
- Stability in soft ground—the strengthened pins bite into soil so the light does not tilt after rain or foot traffic.
- Waterproofed switch—a silicone-capped button and sealed housing keep out splashes so you are not fishing water from the lens after a storm.
What performance can I actually expect across the year?
- In summer with full sun, I typically see about 8–10 hours of illumination after a complete charge.
- On mixed or short-sun days, a realistic range is 6–10 hours, which still covers dusk through most of the night.
- The photosensor charges by day and turns on automatically at dark, so I do not touch a switch.
Placed well, Solar Ground Lights keep steps readable and borders outlined without blasting glare into windows.
Where should I install them to avoid common mistakes?
Good placement decides whether Solar Ground Lights feel reliable. I follow a few rules:
- Avoid under glass roofs—many glass structures filter or block the wavelengths that charge panels efficiently.
- Keep away from infrared camera zones—strong IR can confuse the light sensor in certain setups.
- Do not bury them under permanent shade—branches and eaves cut charging dramatically.
- Plan for at least seven hours of sunlight—that is the baseline for a full evening run.
Which quick facts help me compare options at a glance?
| Key point | Landsign approach | Why it matters to me |
|---|---|---|
| Housing and frame | Stainless steel bezel + ABS body | Resists deformation and corrosion while keeping weight down |
| Charging | High-conversion solar panel | Faster top-ups and steadier output through variable weather |
| Run time | Approx. 6–10 hrs typical, up to 8–10 hrs at full charge | Covers dusk-to-bedtime and most overnights in summer |
| Switching | Photosensor auto on/off + sealed soft-touch button | No daily fiddling, no water ingress after rain |
| Anchoring | Reinforced ground pins | Lights stay upright in lawns, mulch, and garden borders |
How do I install them in minutes without tools?
- Charge in direct sun for a full day before first use so the battery calibrates.
- Press the reinforced pins straight down; if soil is hard, pre-make a pilot hole with a hand trowel.
- Set the lens flush with grade to avoid tripping and to shed water.
- Stagger spacing 0.8–1.2 m along edges for a continuous ribbon of guidance light.
That is genuinely it—the promise of Solar Ground Lights is that the “hardest” part is deciding the pattern you like.
Where do these lights make the biggest visual impact?
- Garden borders that need gentle definition rather than spot glare
- Sidewalks and pathways where feet need a clear edge
- Beneath bushes to outline mass without visible fixtures
- Lawns and small squares where mowing demands a low profile
Across these spaces, Solar Ground Lights give me a tidy look by day and a clear cue by night.
Why do I recommend Landsign when I want fewer headaches?
Landsign does the basics right: a corrosion-resistant rim, a tough ABS body, reinforced stakes that keep alignment, and a photosensor that behaves predictably. Sizes vary for different layouts, and there are stake options for soil types so I am not stuck with a single mounting style. Put simply, my paths look clean, and my maintenance list stays short with Solar Ground Lights that are built to be forgotten until they glow.
What is the takeaway if I am choosing lights today?
- If you need fast installation with no wiring, Solar Ground Lights are the most painless win for paths and beds.
- If you want durability and stable alignment, Landsign’s stainless-plus-ABS build and reinforced pins are practical choices.
- If you prefer “set and forget,” the auto photosensor and waterproofed switch make nightly operation hands-off.
Ready to brighten your space with zero wiring?
If you are mapping a path, refreshing a garden edge, or outlining a square, I am happy to help you specify a layout and quantity that fit your site. Tell me about your sun exposure and soil, and I will suggest a spacing plan using Solar Ground Lights that balances brightness and budget. For quotes, samples, or distributor details, please contact us now—leave your inquiry and I will get back with a tailored recommendation and pricing that makes sense for your project.